

Blog
Card templates and the QR card image: one look for the team
To make a team's cards look alike, choose the same design template on every card and use the same logo and similar photos. The template is picked from four designs in the Images and template step; the QR card image puts the photo, name, title, QR code and logo into one portrait image with a fixed layout.

Contents
Plans: card templates and the QR card image are included in Starter and higher; branding with your company logo and colour in Pro and higher. On the Free plan, cards open in the Classic look.
To make your team's cards look alike, choose the same design template on every card and use the same logo and similar photos. The template is picked in the Images and template step of the card editor, from four designs: Classic, Minimal, Bold and Dark. The QR card image puts a card's photo, name, job title, QR code and logo into one portrait image. Its layout is fixed, so everyone's image comes out in the same arrangement.
This guide covers how the four templates differ, how to pick one, what has to match across a team, and where to download and use the QR card image. For the overall team setup, see how to create digital business cards for a team; for everything a card can do, see the digital business card page.
The four templates
A template does not change what is on the card: the same details, the same buttons and the same order appear in every template. What changes is the background, the cover area and the text colours.
| Template | On the card page | Good for |
|---|---|---|
| Classic | Light background. A card with no template chosen opens in this look. | Most teams; the safe choice if nobody has a preference |
| Minimal | Very light grey background; a flat card with a thin border and no shadow | Understated brands with few colours |
| Bold | The cover area is filled with the main colour, shading darker towards the bottom; an uploaded cover image sits on top of it | Brands with a strong colour, cards without a cover image |
| Dark | Dark background with light text; the contact rows and info boxes turn dark too | Brands with a dark visual identity |
The colour in the Bold template and the ring on the QR card image follow the same rule. In Pro and higher it is the company colour you set under Brand (white-label); in Starter the platform colour is used. If you want your own colour on the cards, decide on the template and the branding together.
Step by step: choose a template
- Open the card: on the Cards screen, edit the card and go to step 4 of the wizard, Images and template.
- Upload the images: profile photo, company logo and, if you like, a cover image. PNG, JPG and WebP files are accepted; a logo on a transparent background works best.
- Pick the template: tap one of the four options under Design template. The live preview beside the form changes with your choice, so you can compare before saving.
- Save and check on a phone: save the card and open the card page on your phone. Make sure the cover, photo and text are easy to read.
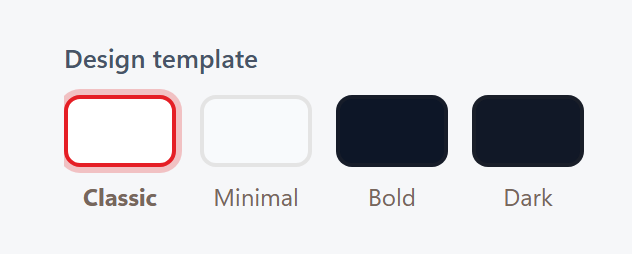
If your plan does not include templates, a lock note with an upgrade link appears in place of the picker and the card is published in the Classic look. If you move to a lower plan, the chosen template is not deleted; the card simply shows as Classic until the plan includes templates again.
One look for the team: what has to match?
Templates are chosen card by card. There is no company setting that applies a template to every card at once, so a consistent look comes from a few habits:
- One template decision: agree on the template once and write it down, so everyone creating a card makes the same choice.
- A model card and duplicates: set up the first card completely and create the others with Duplicate on the card row. The copy carries the logo, cover image, links and documents. It starts inactive, so you can correct the details before publishing it.
- Pick the template again on copies: a duplicate does not carry the template choice and starts as Classic. Select the template in step 4 before you publish the copy. The copy also carries the original photo, so upload the new person's photo.
- The same logo file: the Company logo field is stored per card. Using the same file everywhere keeps both the card pages and the QR card images consistent.
- Similar photos: square shots with the face centred and a similar background. Photos taken in different light and framing look untidy even in the same template.
- Job title style: write titles to one rule: abbreviations or full words, department first or last.
- Branding (Pro and higher): the company logo and main colour set under Brand (white-label) apply to all cards together.
- The same check for new joiners: when you create a card for someone new, run through the template, logo and photo with the same list. The onboarding steps are in a new hire's business card on day one.
For the rest of the team setup, such as who creates and updates cards and what happens to a leaver's card, see managing digital business cards for a team.
What is the QR card image?
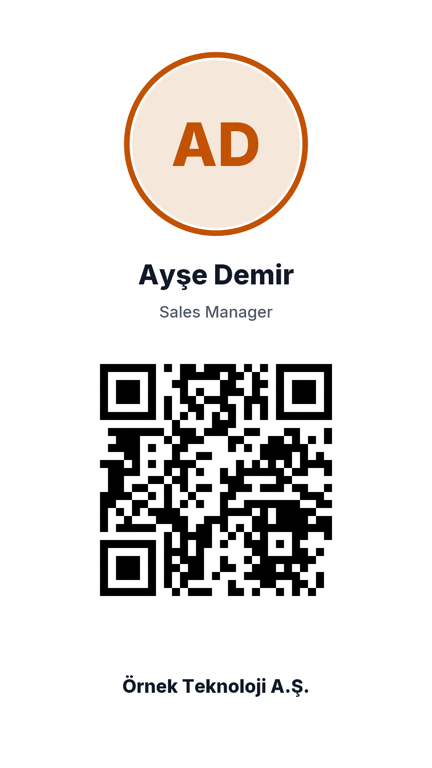
The QR card image is a portrait PNG, 1080 × 1920 pixels, that you get with the Download card image button in the panel. The layout is fixed:
- a white background with a round profile photo at the top, framed by a ring in the main colour;
- the full name in bold under the photo, with the job title below it;
- the card's QR code in the middle;
- the card's logo at the bottom.
If the card has no photo, the initials of the first and last name appear inside the ring on a light tint of the main colour. If there is no logo, the company name is written at the bottom instead. The image does not follow the card's design template: a card using the Dark template still gets an image with a white background. That is why everyone's image has the same layout, whichever template they use.
Where each part of the image comes from
| Element | Source | Watch out for |
|---|---|---|
| Ring colour | Company colour in Pro and higher, platform colour in Starter | The same as the main colour on the card page |
| Photo | The card's profile photo | It is cropped to a square from the centre and placed in a circle; keep the face centred |
| Name and job title | The card's main identity fields; the English job title from the English page step is not used | Long text shrinks first, then wraps to two lines at most; anything longer ends with "…" |
| QR code | The card's address | Leads from this code are marked with QR as their source in the panel |
| Logo or company name | The card's Company logo field; the company field if there is no logo | Avoid a team where some images show a logo and others show text |
The QR code is drawn with sharp edges and keeps white space around it, which phone cameras need to pick it out. When you crop the image or place it in a design, do not cut into that white margin.
Where to download it
- The ready box: the Download card image button in the Your card is ready box that appears after you save a new card.
- The card's edit screen: in the Sharing and this card's pages section at the bottom, next to Download QR code.
- The card list: the QR card image icon on each card's row.
- Event QR codes: type a tag into the Event QR code field in the same section and press Card image. The QR code in the image then carries that tag, and leads from it are grouped by tag on the Leads screen.
The file name comes from the card's address, for example "first-last-kartvizit.png"; event images add the tag: "first-last-expo-2026-kartvizit.png". Downloading is available to administrators and editors on plans that include QR codes and Save Contact, that is, Starter and higher.
Where to use it
- In your phone's gallery: open the image at a meeting and show the screen; the other person scans the QR code and your card opens. You do not need to open your own card page.
- At fairs and events: each person on the stand keeps their own event image on their phone, and leads are grouped by the fair's tag. See digital business cards at trade fairs and events for the full preparation.
- Desks and slides: a small stand on the reception desk or the last slide of a presentation.
- Careful with messages: someone who receives the image in a chat cannot scan a QR code on their own screen. Send the card link alongside it.
For printed items such as business cards, brochures or signs, it is more flexible to download the QR code on its own and place it in your design. Sizes and print rules are in QR code business card best practices.
Common mistakes
- Forgetting the template on a copy: a duplicated card starts as Classic and stands out from the rest.
- Photos taken from a distance: the face ends up tiny inside the circle. Use a close, square photo.
- Long job titles: anything beyond two lines is shortened in the image. Keep the title short and put the detail in the About text.
- Missing logos: a card without a logo shows the company name as text, so the team's images no longer match.
- Changing the card address after sharing: the QR code points to the card's address. Do not change it once the image is out; if you must, download a new image.
Frequently asked questions
Can I apply a template to all cards at once?
No. Each card has its own template setting. The quickest route is to finish a model card, duplicate it and select the template on each copy.
Why is the colour on the QR card image not our company colour?
Your company colour appears on cards through the Brand (white-label) setting in Pro and higher. In Starter, the ring on the image and the cover of the Bold template use the platform colour.
Do I need to download the image again when my details change?
The QR code points to the card's address, so an older image keeps working and opens the current card. The name, title, photo and logo printed on the image, however, are a snapshot from the moment you downloaded it; if any of those changed, download it again.
Does changing the template change the card address or QR code?
No. The template only changes how the card page looks. The card address, the QR codes you have already shared and the NFC tag stay the same, so you can switch templates at any time.
Which plan do I need?
Card templates and the QR card image are in Starter and higher; branding with your logo and colour in Pro and higher. Compare plans on the pricing page.


